
The next add on board I looked at was essentially an RGB LED ring that you connected to the micro:bit, you attached it and using the supplied screws connected it to the micro:bit, the board will not work if you do not do this. Now, I’m not a great fan of add on boards like this but i thought I would take a look at it. This is what a typical module looks like, several vendors sell these
RGB LED Expansion Board
This board can be used for various projects whether a simple clock or just an attractive decoration
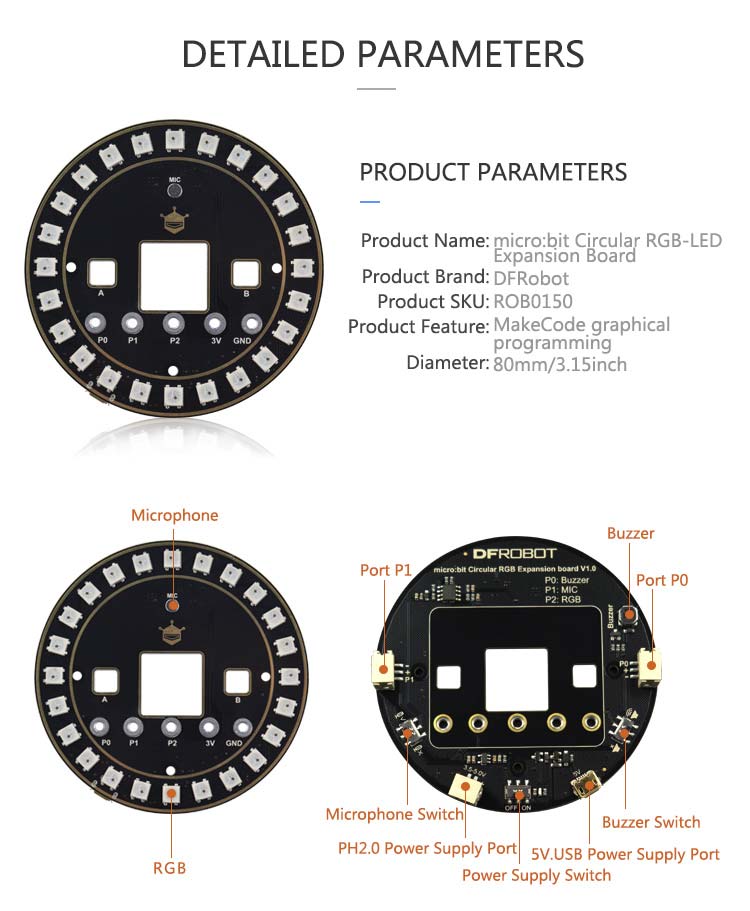
It has an onboard buzzer which is connected to P0 and this can be incorporated into your projects, there is also a microphone so you could create a project where you speak into the microphone and you could vary the amount of LEDs that light or even alter the different colours displayed, remember these are RGB led’s and can display millions of colours.
Features
Support USB interface power supply and direct use of power-bank power supply or USB computer power supply.
24 RGB single-line lights, 16 million colors free mixing
Makecode graphical programming or easily programmable using python
Onboard microphone and buzzer
Leaded out P0 and P1 interfaces, and distribute with the connection line, support the boson expansion modules.
Ultra-thin volume,more suitable for wearable and strap applications.
Specification
Supply Voltage:3.5~5V
WS2812 Single-line RGB LEDs x 24
Onboard buzzer x 1
Onboard microphone x 1
Number of interfaces: IO expansion board(P0,P1)x2, PH2.0 Power Interface x1, USB power Interface x1
Parts List
| Name | Link |
| Microbit | Micro:bit Development Board |
| RGB LED Expansion Board | RGB LED Expansion Board |
Code examples
The links are all makecode examples – nah lets have some micropython examples. I used Mu with all of these.
Now its not all that difficult you simply need to import the Neopixel library and then you have to input the number of LEDs, which in this case is 24 and the pin that you use for the LEDs which in this case is pin2.
Example 1
[codesyntax lang=”python”]
from microbit import *
from neopixel import NeoPixel
from random import randint

num_pixels = 24
#Neopixel with 8 LEDs
neo = NeoPixel(pin2, num_pixels)

while True:
        neo[0] = (255, 0, 0)
        neo[1] = (0, 255, 0)
        neo[2] = (0, 0, 255)
        neo[3] = (128, 0, 0)
        neo[4] = (0, 128, 0)
        neo[5] = (0, 0, 128)
        neo[6] = (128, 128, 0)
        neo[7] = (0, 128, 128)
        neo.show()
        sleep(250)
[/codesyntax]
Example 2
[codesyntax lang=”python”]
from microbit import *
from neopixel import NeoPixel

num_pixels = 24
redcolour = [0xFF, 0x00, 0x00]  # Hex color - red, green and blue
greencolour = [0x00, 0xff, 0x00]
bluecolour = [0x00, 0x00, 0xFF]

ring = NeoPixel(pin2, num_pixels)

while True:
    # blue dot circles around a white background (for PixelRing 24)
    for i in range(0, num_pixels):
        ring[i] = redcolour     # set pixel i to redcolour
        ring.show()              # actually display it
        sleep(1000)                # milliseconds
        ring[i] = greencolour     # set pixel to greencolour before moving on
        ring.show()
        sleep(1000)
        ring[i] = bluecolour     # set pixel to greencolour before moving on
        ring.show()
        sleep(1000)
[/codesyntax]
Example 3
[codesyntax lang=”python”]
from microbit import *
from neopixel import NeoPixel
from random import randint

num_pixels = 24
#Neopixel with 8 LEDs
neo = NeoPixel(pin2, num_pixels)

while True:
    #Iterate over each LED in the strip
    for pixel_id in range(0, len(neo)):
        neo[pixel_id] = (5, 0, 0)
        neo.show()
        sleep(250)
[/codesyntax]
Example 4
[codesyntax lang=”python”]
from microbit import *
from neopixel import NeoPixel

num_pixels = 24
foreground = [0x00, 0x00, 0xFF]  # Hex color - red, green and blue
background = [0x10, 0x10, 0x10]

ring = NeoPixel(pin2, num_pixels)

while True:
    # blue dot circles around a white background (for PixelRing 24)
    for i in range(0, num_pixels):
        ring[i] = foreground     # set pixel i to foreground
        ring.show()              # actually display it
        sleep(50)                # milliseconds
        ring[i] = background     # set pixel to background before moving on
        ring.show()
[/codesyntax]
Example 5
[codesyntax lang=”python”]
from microbit import *
from neopixel import NeoPixel
from random import randint

num_pixels = 24
#Neopixel with 8 LEDs
neo = NeoPixel(pin2, num_pixels)

while True:
    #Iterate over each LED in the strip
    for pixel_id in range(0, len(neo)):
        red = randint(0, 10)
        green = randint(0, 10)
        blue = randint(0, 10)
        neo[pixel_id] = (red, green, blue)
        neo.show()
        sleep(250)
[/codesyntax]