
In this example we introduce you to Micropython on an ESP32, we will flash the on board LED on a Wemos Lolin32. We used the uPyCraft IDE.
First of all you need to download the latest version of uPyCraft – I am a Windows user and this works fine on Windows 7 and Windows 10, so head along to https://github.com/DFRobot/uPyCraft and download the latest version – at the time of writing this it is v 1.0 – uPyCraft_V1.0.exe
Next you need to connect your Wemos Lolin to your PC – in the IDE select the serial port of the board in Tools -> Serial Port and then select the board by picking Tools -> board and select ESP32
A couple of options for flashing the firmware using uPyCraft, you can let the IDE download a version or download the latest version from the micropython site and flash this to your board. The latest version of the MicroPython firmware for the ESP32 is available from the MicroPython Downloads page now scroll all the way down to the ESP32 section.
In the IDE go to Tools > BurnFirmware menu to flash your ESP32 with MicroPython.
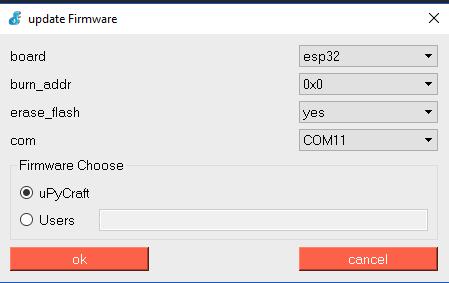
Note : Some ESP32 boards may require you to hold the “BOOT/FLASH” button on the ESP32 board
Parts List
I used a Wemos Lolin32 in this example but there are many ESP32 variants you can use
| Name | Link |
| ESP32 board | New ESP-32 esp32 Lite V1.0.0 For Rev1 wifi Module + bluetooth board 4MB FLASH |
Code
The on board LED is connected to pin 5 on the Wemos Lolin32, we will flash this ona nd off
[codesyntax lang=”python”]
from machine import Pin
from time import sleep

led = Pin(5, Pin.OUT)

while True:
  led.value(not led.value())
  sleep(0.5)
[/codesyntax]