
In this article we connect a MMC5603 Triple-axis Magnetometer to an Adafruit Feather M0 running Circuitpython
A Magnetometer can sense where the strongest magnetic force is coming from, this means that they are generally used to detect magnetic north, but can also be used for measuring magnetic fields.
Sensor Information
The MMC5603NJ is a monolithic complete 3-axis AMR magnetic sensor with on-chip signal processing and integrated digital bus (I2C fast mode and I3C interface), the device can be connected directly to a microprocessor, eliminating the need for A/D converters or timing resources.
It can measure magnetic fields within the full scale range of 30 Gauss (G), with up to 0.0625mG per LSB resolution at 20bits operation mode and 2mG total RMS noise level, enabling heading accuracy of 1º in electronic compass applications. Contact MEMSIC for access to advanced calibration and tilt-compensation algorithms.
FEATURES
Superior Dynamic Range and Accuracy:
±30 G FSR
20bits operation mode
0.0625mG per LSB resolution
2 mG total RMS noise
Enables heading accuracy of 1º
Sensor true frequency response up to 1KHz
On-chip automatic degaussing with built-in SET/RESET function
Eliminates thermal variation induced offset error (Null field output)
Clears the residual magnetization resulting from strong external fields
On-chip sensitivity compensation
On-chip temperature sensor
Selftest signal available
Data_ready Interrupt (I3C only)
Low power consumption
1 µA power down current
I2C slave, FAST (≤400 KHz) mode
I3C interface available
1.62V to 3.6V w
Parts Required
The sensor you can pick up in the $6 price range – you can connect to the sensor using a standard header the classic dupont style jumper wire.
I used a Qwiic cable – since a few sensors seem to use these but this is optional
| Name | Link |
| Adafruit Feather M0 Express | Amazon link |
| MMC5603 Triple-axis Magnetometer | |
| Connecting cables | Aliexpress product link |
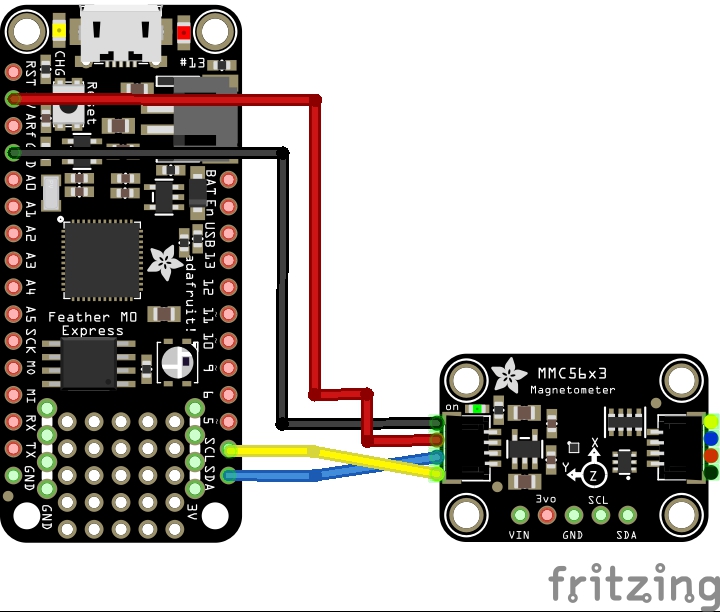
Schematic/Connection
I used the Adafruit MMC56x3 sensor and in this case used the Stemma connection
For the STEMMA QT cables, it uses the Qwiic convention:
Black for GND
Red for V+
Blue for SDA
Yellow for SCL
So color coded for ease of use, this layout shows a connection to the module
Code Example
I used Thonny for development
The following is based on a library, I copied the adafruit_mmc56x3.mpy library for this device to the lib folder on my Feather M0 Express – https://circuitpython.org/libraries
This is the basic example that comes with the library
""" Display magnetometer data once per second """

import time
import board
import adafruit_mmc56x3

i2c = board.I2C()  # uses board.SCL and board.SDA
# i2c = board.STEMMA_I2C()  # For using the built-in STEMMA QT connector on a microcontroller
sensor = adafruit_mmc56x3.MMC5603(i2c)

while True:
    mag_x, mag_y, mag_z = sensor.magnetic
    temp = sensor.temperature

    print(
        "X:{0:10.2f}, Y:{1:10.2f}, Z:{2:10.2f} uT\tTemp:{3:6.1f}*C".format(
            mag_x, mag_y, mag_z, temp
        )
    )
    print("")
    time.sleep(1.0)
Output
Here is what I saw in Thonny REPL window
Adafruit CircuitPython 8.0.5 on 2023-03-31; Adafruit Feather M0 Express with samd21g18
>>> %Run -c $EDITOR_CONTENT
X: 66.72, Y: -20.64, Z: -41.55 uT Temp: 15.4*C
X: 66.72, Y: -20.76, Z: -41.17 uT Temp: 15.4*C
X: 66.81, Y: -21.04, Z: -40.72 uT Temp: 15.4*C
X: 66.66, Y: -20.91, Z: -41.44 uT Temp: 15.4*C
X: 64.12, Y: -21.11, Z: -33.71 uT Temp: 17.0*C
X: 51.40, Y: -52.95, Z: -36.66 uT Temp: 16.2*C
X: 61.97, Y: -12.61, Z: -37.37 uT Temp: 16.2*C
X: 64.37, Y: -36.11, Z: -38.81 uT Temp: 15.4*C
Links