
In this article we connect a TLV493D magnetic sensor to an Adafruit Feather M0 running Circuitpython
Sensor Information
The Infineon TLV493D-A1B6 magnetic sensor offers accurate three dimensional sensing with extremely low power consumption in a small 6-pin package.
With an opportunity to detect the magnetic field in x, y, and z-direction the sensor is ideally suited for the measurement of 3D movements, linear movements and rotation movements.
It is usable in any kind of industrial and consumer applications that require a low power consumption.
Applications include joysticks, control elements, or electric meters and any other application that requires accurate angular measurements or low power consumptions
Features
• 3D magnetic sensing
• Very low power consumption = 10 µA during operations (10 Hz, typ.)
• Power down mode with 7 nA power consumption
• Digital output via 2-wire based standard I2C interface up to 1 MBit/sec
• 12-bit data resolution for each measurement direction
• Bx, By and Bz linear field measurement up to +130 mT
• Excellent matching of X/Y measurement for accurate angle sensing
• Variable update frequencies and power modes (configurable during operation)
• Supply voltage range = 2.7 to 3.5 V operating supply voltage, Temperature range = -40 °C to 125 °C
• Small, industrial 6 pin TSOP package
• Triggering by external µC possible
• Interrupt signal available to wake up a microcontroller
• Temperature measurement
Parts Required
The sensor you can pick up in the $6 price range – you can connect to the sensor using a standard header the classic dupont style jumper wire.
I used a Qwiic cable – since a few sensors seem to use these but this is optional
| Name | Link |
| Adafruit Feather M0 Express | Amazon link |
| TLV493D-A1B6 magnetic sensor | |
| Connecting cables | Aliexpress product link |
Schematic/Connection
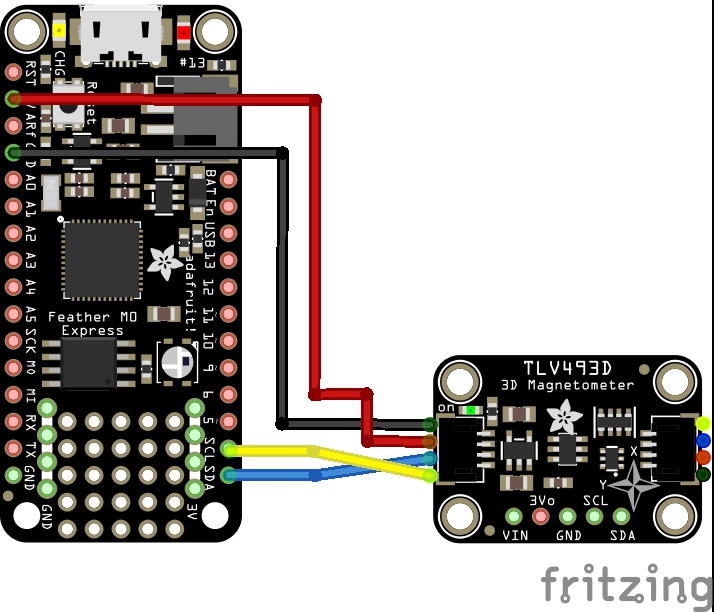
I used the Adafruit TLV493D magnetic sensor and in this case used the Stemma connection
For the STEMMA QT cables, it uses the Qwiic convention:
Black for GND
Red for V+
Blue for SDA
Yellow for SCL
So color coded for ease of use, this layout shows a connection to the module
Code Example
I used Thonny for development
The following is based on a library, I copied the adafruit_tlv493d.mpy library for this device to the lib folder on my Feather M0 Express – https://circuitpython.org/libraries
This is the basic example that comes with the library
# SPDX-FileCopyrightText: 2021 ladyada for Adafruit Industries
# SPDX-License-Identifier: MIT

import time
import board
import adafruit_tlv493d

i2c = board.I2C()  # uses board.SCL and board.SDA
# i2c = board.STEMMA_I2C()  # For using the built-in STEMMA QT connector on a microcontroller
tlv = adafruit_tlv493d.TLV493D(i2c)

while True:
    print("X: %s, Y: %s, Z: %s uT" % tlv.magnetic)
    time.sleep(1)
Output
Here is what I saw in Thonny REPL window
Adafruit CircuitPython 8.0.5 on 2023-03-31; Adafruit Feather M0 Express with samd21g18
>>> %Run -c $EDITOR_CONTENT
X: 0.0, Y: 0.0, Z: 0.0 uT
X: -196.0, Y: 0.0, Z: 0.0 uT
X: -98.0, Y: 0.0, Z: 0.0 uT
X: -196.0, Y: -98.0, Z: -98.0 uT
X: 0.0, Y: 294.0, Z: -98.0 uT
X: -196.0, Y: -98.0, Z: 0.0 uT
X: 0.0, Y: 0.0, Z: 0.0 uT
X: -196.0, Y: 0.0, Z: 0.0 uT
Links